
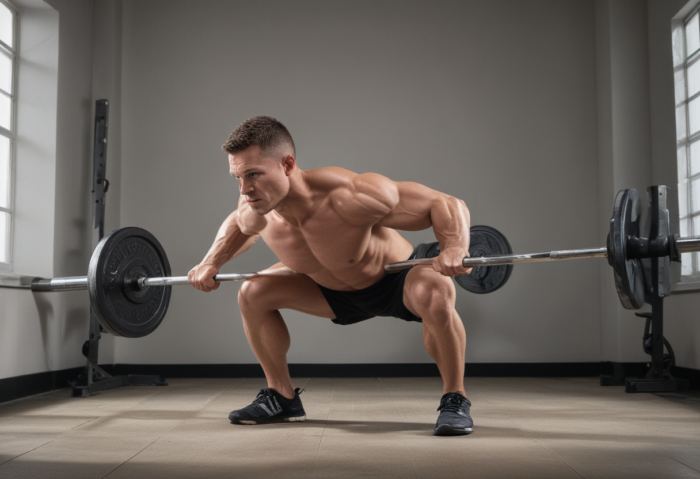
Jefferson squat: technique and training benefits
A squat doesn’t always have to mean a barbell on your back and your feet planted perfectly symmetrically. The Jefferson squat is an old strongman exercise that works your legs, hips and trunk stability from a different angle than a regular squat or deadlift.
If your lower-body training has become repetitive, it’s worth learning this movement calmly, with a light weight, adjusting it to your own body.
Why is a Jefferson-style squat useful in the first place?
The Jefferson squat or Jefferson deadlift is a classic exercise that has simply disappeared from many gym programs. That’s a shame, because it builds strength, power, lower-body muscle mass, hip mobility and body control all at once.
The big difference is the position. You stand straddling the barbell, not behind it or in front of it. Your center of gravity stays under your body and your feet create a wide base of support. This helps keep your spine more upright and reduces the feeling that your lower back has to do all the work.
It’s also an asymmetrical exercise. One foot is forward, the other back; one hand grips from the front and the other from behind. That’s exactly what makes the exercise interesting. For some people the left foot forward works better, for others the right foot forward. For some it makes little difference. A simple truth: ideal technique isn’t exactly the same for everyone.
Dave Dellanave, a well-known advocate of the Jefferson squat and deadlift, has held the world record for this lift: at a body weight of 92 kg, Dellanave pulled 275 kg Jefferson-style. That says quite clearly that the exercise isn’t just an “interesting change of pace” but a genuine strength lift.
How does the Jefferson squat work?
The biomechanics are simple. You stand over the barbell, squat down, grip the barbell and stand up. Your body’s center of gravity has to stay as close to directly over the barbell as possible. When that works, the lift feels surprisingly natural.
In a regular deadlift, the weight is in front of you. In a sumo deadlift your feet are wider, but the barbell still stays mostly in front. In a Jefferson deadlift or squat the barbell is beneath you, so you can often keep your torso more upright. The load on the spine doesn’t disappear, but the shear forces may be smaller.
The author of the article also tried this movement with heavy weight. They started at 100 kg and worked up in triples to 145 kg, then in singles up to 185 kg. At first the 185 kg only came halfway up because the grip gave out. With a mixed grip the 185 kg came up, and quite easily. For comparison, the author’s conventional deadlift record was 205 kg, and the effort of the 185 kg pull felt like a 7 out of 10. The author reckoned that with a focus on this lift, 225 kg could become realistic after a while.
How do you do a Jefferson squat?
- Stand straddling the barbell.
- Squat down and grip the barbell.
- Stand up with the barbell.
That’s a simple description, but the real work starts with the details. Your feet can be slightly wider or narrower. Your hands can be closer to your body or a little wider. Try both variations: left foot forward and right foot forward.
Squat technique: what to watch for
- Keep your back and spine straight and fairly upright throughout the lift.
- Don’t let your knees cave inward as you pull the weight off the floor.
- Don’t lock your knees too quickly, or the movement turns into a good morning.
- Use a grip fairly close to shoulder width.
Start light. This isn’t an exercise where your first workout should immediately deliver records. Do a few easy sets and feel whether the work goes into your thighs, glutes, hips and core. If your lower back is the first to scream, check your torso position and the barbell placement.
A good idea is to start with longer sets and lighter weights. Once the movement feels natural, you can try shorter sets and heavier weight. Honestly, the Jefferson squat is exactly the kind of exercise that teaches you to listen to your body. You figure out quite quickly which foot position works and which doesn’t.
Practical tips before you try it
Don’t overcomplicate the technique. Put the barbell down, step over it and find a position where you feel strong. If your hips are very stiff, do some light warm-up first: bodyweight squats, hip circles or slow lunges.
Grip can be the limiting factor. If the weight moves but your fingers give out, try a mixed grip. At the same time, don’t use your grip as an excuse to take too much weight. The Jefferson squat should remain a controlled lift, not a wrestling match with the barbell.
It fits well into a training program on a lower-body day. You can do it after your main squat or deadlift, but in some weeks you can also use it as your main heavy exercise. The variety is genuinely valuable here, because the movement angle is different.
FAQ: Jefferson squat
Is the Jefferson squat suitable for beginners?
Yes, as long as the load is light and the technique is controlled. Beginners should start with an empty barbell or a very light weight and learn the position first rather than chase kilos.
Is it more of a squat or a deadlift?
That depends on your body position. For some people the movement feels more like a squat, for others more like a deadlift. That is why both names are used: Jefferson squat and Jefferson deadlift.
What should you do if one side feels uncomfortable?
Switch legs and grip. Try the left foot in front and then the right foot in front. If one option clearly feels better, use it, but don’t ignore pain or significant discomfort.
Translator’s note: I discovered this exercise myself while preparing for the spring 2014 season. Done properly and with a good mind-muscle connection, it works the legs really nicely. It is especially good at working the inner thighs. Kai Greene also does the Jefferson squat quite often on his leg days.
Author: Janar Rückenberg (translation)
Come and train! ArtGym